 plans with storage - front view." width="930" height="588" />
  plans with storage - floor view." width="640" height="592" />
  plans with storage - side view." width="994" height="718" />
  plans with storage - back view." width="930" height="456" />
 plans with storage - free PDF download at Construct101" width="660" height="330" />
10×14 goat shelter plans with storage, plans include a free PDF download (link at bottom of blog post), shopping list, cutting list, and step-by-step instructions with drawings.
plans with storage - front view." width="930" height="588" /> plans with storage - floor view." width="640" height="592" /> plans with storage - side view." width="994" height="718" /> plans with storage - back view." width="930" height="456" />
A shopping list is included, since lumber can be purchased in different sizes study the cut list to see what works best for you.
Floor
Walls
Front Wall Frame
Back Wall Frame
Inside Wall Frame
Right/Left Wall Frame
Rafters
Storage Floor
Siding
Roof
Door
Trim
 plans with storage - floor - 4x6x14" width="1144" height="199" />
Cut two 4×6’s to 14′ long.
 plans with storage - 4" width="1185" height="199" />
Cut three 4×6’s to 10′ long.
 plans with storage - floor frame." width="848" height="374" />
Assemble the floor frame as shown on illustration above using 3 1/2″ deck screws.
 plans with storage - front wall frame." width="1136" height="786" />
Front Wall Frame:
Cut two 2×4’s to 14′ long. Cut nine 2×4’s to 7′ 4 1/2″ long. Cut four 2×4’s to 6′ 6″ long. Cut six 2×4’s to 7″ long.
Cut two 2×4’s to 3′ 3″ long. Cut one piece of 1/2″ plywood to 3 1/2″ x 3′ 3″. Cut two 2×4’s to 3′ 10 1/2″ long. Cut one piece of 1/2″ plywood to 3 1/2″ x 3′ 10 1/2″. Assemble the header using 3 1/2″ nails as shown on illustration below.
Assemble the front wall as shown on illustration above using 3 1/2″ nails.

 plans with storage - back wall frame." width="1058" height="586" />
Back Wall Frame:
Cut two 2×4’s to 14′ long. Cut eleven 2×4’s to 5′ 8 1/2″ long. Assemble the back wall frame as shown on illustration above using 3 1/2″ nails.
 plans with storage - inside wall frame." width="936" height="698" />
Inside Wall Frame:
Cut two 2×4’s to 9′ 5″ long. Cut six 2×4’6 to 5′ 8 1/2″ long. Assemble as shown on illustration above using 3 1/2″ nails.
 plans with storage - inside wall frame siding." width="542" height="590" />
Cut to size and install the 1/2″ plywood wall siding to the inside wall using 2″ nails.
 plans with storage - side wall frame." width="900" height="658" />
Right/Left Wall Frame:
Cut four 2×4’s to 9′ 5″ long. Cut twelve 2×4’s to 5′ 8 1/2″ long. Assemble as shown on illustration above using 3 1/2″ nails.
 plans with storage - wall frame." width="828" height="578" />
Use 3 1/2″ nails to attach the walls to the floor frame.
 plans with storage - rafter. " width="1066" height="296" />
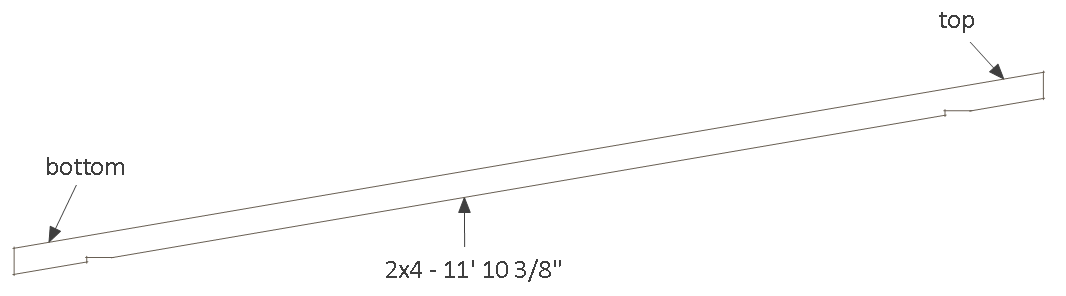
Cut eight 2×4’s to 11′ 10 3/8″ long, cut the top and bottom ends as shown on illustration below.
 plans with storage - rafter top end." width="1068" height="258" />
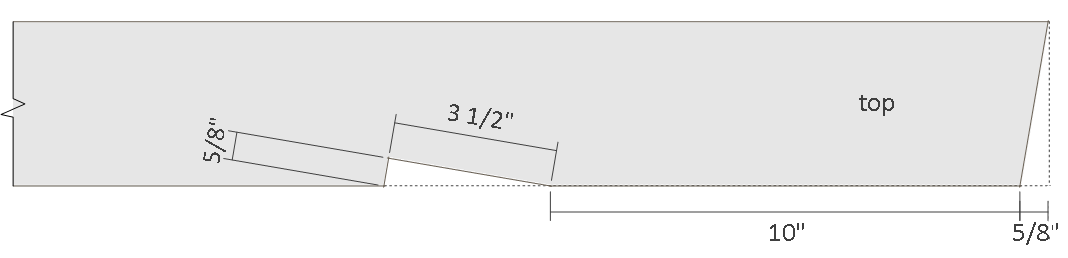
Cut the top end of the rafters as shown on illustration above.
 plans with storage - rafter bottom end." width="1176" height="416" />
Cut the bottom end of the rafters as shown on illustration above.
 plans with storage - rafters/truss." width="928" height="636" />
The rafters are installed 24″ O.C., install as shown on illustration above using 3 1/2″ nails.
 plans with storage - top side wall studs." width="824" height="628" />
Cut two 2×4’s to 1′ 7 1/4″ long, two 2×4’s to 1′ 3 1/8″ long, two 2×4’s to 11″long, and two 2×4’s to 6 7/8″ long. Notch the top of the 2×4’s and install as shown on illustration above.
 plans with storage - floor joist." width="970" height="544" />
Cut a 2×4 to 9′ 1″ long. Install as shown on illustration above using 3 1/2″ nails.
Cut and remove the 2×4 bottom plate from door opening as shown on illustration above.
 plans with storage - plywood floor." width="787" height="535" />
Measure and cut 3/4″ plywood floor to size, install plywood floor using 2″ deck screws.
 plans with storage - 2x4 blocking." width="820" height="572" />
Cut 2×4 blocking to size and install to the front and back as shown on illustration above.
 plans with storage - t1-11 siding." width="956" height="624" />
Cut to size and install t1-11 exterior siding using 2″ finishing nails.
Cut out door opening, the siding that is cut out will be used to make door.
 plans with storage - purlins." width="1018" height="698" />
Cut seven 2×4’s to 16′ long for the purlins. Install as shown on illustration above using 3 1/2″ nails.
 plans with storage - roof blocking." width="1002" height="708" />
Measure and cut 2×4 blocking and install between the purlins as shown on drawing above.
 plans with storage - metal roofing." width="1024" height="720" />
Install metal corrugated roofing panels.
 plans with storage - 2x4 door opening trim." width="1178" height="662" />
Cut two 2×4’s to 6′ 8 1/2″ long, cut one 2×4 to 3′ 7″ long. Install the 2×4’s to the door opening using 2 1/2″ finishing nails.
 plans with storage - door." width="342" height="630" />
Use the t1-11 exterior siding from the door opening to build the storage door. Measure and cut 2×4’s to size and install as shown on illustration above. Nail 2″ nails through the siding and into the 2×4’s.
 plans with storage - door installed. " width="1008" height="628" />
Install hinges to the door and install door to shelter.
 plans with storage - gate." width="715" height="573" />
Cut five 1×6’s to 3′ 7 1/2″ long. Cut two 1×6’s to 2′ 11 1/2″ long. Cut one 1×6 to 3 11 1/2″ long, cut 40.5-degree angle cuts on both ends in the same direction. Install as shown on illustration above using 1 1/2″ deck screws.
 plans with storage - gate installed. " width="920" height="588" />
Install hinges to gate and install to shelter.
 plans with storage - 1x4 corner trim." width="954" height="610" />
Measure and cut 1×4 to size for corner trim. Install corner trim using 2″ finishing nails.
 plans with storage - free PDF - material list - Construct101" width="930" height="572" />
 plans with storage - free PDF download at Construct101" width="300" height="150" />


This is a great design! Thanks for sharing it. My only suggestions for improvement is on the gate/door (and even this might not be needful for everyone). Unless your paddock setup provides a fenced separation between the stall and the storage room, I’d suggest using Dutch doors on the storage unit. When you are in there, you’ll need light. If you have to keep the door open for that light, you’ll likely have a lot of company! My Nubian goats are like puppies — they love to be wherever I am — so I’ve started using Dutch doors on nearly all my buildings for this reason. The second suggestion is similar but for a different reason: put an upper gate on your stall as well. In my area we have a heavy predator load (cougar, bobcat, coyote and even the occasional wolf). I keep several guardian dogs — but having the ability to completely close the stall is just an added layer of security. The double gate (“Dutch”) enables me to do this. It is also handy when I need to isolate an animal due to illness or kidding. They still get sunshine and air if the upper gate is open, but they are securely contained by the lower door. All in all, to me it’s not a lot of work for the added benefits.
Mike PaulisGreat project!! No major hiccups, order list was spot on. Only needed the tools I already had on hand. Couldn’t ask for a better finished product for the plan. We used the T-1 11 cut out on the pen as a Dutch door and added some latches to hold it open. Also added some shelving in the hay storage for treats, halters and leashes. Hung a white board for keeping track of meds and birthdays too.
Thank you so much for putting these plans out there it saved us thousands of dollars and made me a hero to my wife and kids!
If I could add photos I would in a heartbeat!!
I have a question…. might be silly by how did you attach the shelter to the ground? I was thinking about using cement blocks to attach the 4×6 base…. I was told to cement 4×4’s as a post and cemented 24” deep into ground. Is this really necessary? I appreciate your feedback. I’m attempting this project by myself.